Monday, 12 December 2022

Mac: Set command alias

On all my computers I like to set up a dedicated drive where I keep my development work, often time's I find myself navigating through the command line to get to my dev drive, it's nothing crazy 

cd /Volumes/dev


however I prefer to have something a long the lines of 'gotodev' because I switch between my windows work pc and my home Mac it's just one of those little nice to haves.


On a Mac to set up a path alias, open up a new terminal and you should start your journey in your home directory, which is great, cause that is exactly where you want to be.


type in the command


ls .zshrc 


if nothing comes up then you need to create it, simply type in


touch .szhrc 


this will create a .zshrc file in your home directory

Next you are going to have to open it with the command


nano .zshrc


this will open your .zshrc file in a terminal text editor, and add the following line


alias gotodev='cd /Volumes/dev'


the result should look something like the following


Once you have added your alias exit the editor and make Sure you save your changes, and from now one when you type in 'gotodev' in your terminal you should be navigated to '/Volumes/dev'


to test out out your command hit commad+t to tab open a new command window and type in 'gotodev'

Wednesday, 16 November 2022

NavMesh 02

Continuing from where we left off in our last post,  we had a very simple 'Plane' game object and a 'Player' game object that could move around our plane. Now let's create some obstacles for our 'Player' game object to circumnavigate.

But before we get started let's increase the size of our plane, try doubling it for now

All I did was increase the X and Z scale to 2, doubling our planes Surface area, you may also notice that I've shrunk our sphere to 0.5; In way quadrupling our surface area (don't quote me on the math there).

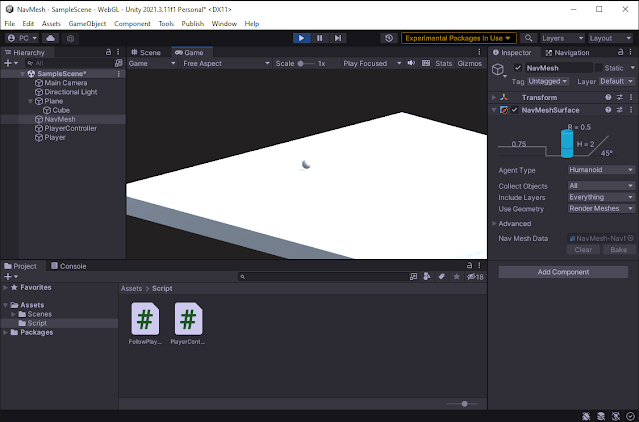
Let's give our plane some girth, add a cube as a sub object of the plane, make it roughly the same size or even a little bigger and position it directly underneath our plane.

I've selected the plane to highlight the borders.

Now let's create a 'FollowPlayer.cs' Script in our Scripts folder, this will move our camera with our 'Player' Game Object.

using UnityEngine;

public class FollowPlayer : MonoBehaviour
{
    //reference to the player game object
    public GameObject Player;

    //reference to camera Z start point
    private float cameraZ;

    void Start(){
        // save the cameras initial Z point
        this.cameraZ = this.transform.position.z;
    }
    void LateUpdate()
    {
        var x = this.transform.position.x;
        var y = this.transform.position.y;
        //Maintain consistent z distance between Camera & Player
        var z = Player.transform.position.z + cameraZ;

        //update camera position.
        var newCameraPos = new Vector3(x, y, z);
        this.transform.position = newCameraPos;

        //rotate camera to look at the player
        this.transform.LookAt(Player.transform);
    }
}

Once your script is complete we're going to add it to our 'Main Camera' game object.

Next add a reference to our 'Player' game object inside our 'Follow Player' script. With our Script attached to our 'Main Camera' open the Camera component and change the 'Clear Flags' property to solid color and set that color to black or an off black color.

Let's bake our our NavMesh again to update it with our new size change, Select the 'NavMesh' Game Object from our Hierarchy and in the Inspector click the 'Bake' button.

Now hit play and try out our little game, it should look something like this.

now let's build some obstacles, create an empty Game Object and call it obstacles, we're just doing this to group our GameObjects in our Hierarchy so that it doesn't get too cluttered.


I created four cubes and scaled them to different sizes and placed them around the plane, now there positioning isn't too important just that there's enough room for our ball to move between them. 

You may have noticed that white on white white is proving to be pretty difficult to keep track of, let's add some colour to our world, let's create a new folder called Materials and add a material called 'DarkGreen'


Select Your new 'DarkGreen' Material and set its color to hot pink, no wait I mean dark green, just like you did for the Camera background earlier.


with that complete, create colours for obstacles, player and the plane base, we'll use dark green for our Plane.


with all of our colours defined, you can either drag and drop the materials onto the Objects you want them to be applied to. Now if you click play again after you've applied all your materials you should see something like the following.


Great except for the part where our Player is moving through obstacles, but let's fix that, exit play mode and select our 'NavMesh' GameObject in our Hierarchy and again click the 'Bake' button.

Let's play our game again.

better than last time, at least our player isn't moving through our obstacles, but it's still not going around them. We have basically three options to force our player to move around our Obstacles.
  1. Add a 'NavMeshModifier' to our obstacles and flag them as not walkable.
  2. Increase the Obstacles height so that the Agent can't get over it
  3. Decrease the Agents ability to go over obstacles 
Firstly you can create a NavMeshModifier component and override the area as not walkable, to demo this click on the 'Obstacles' game object and add the 'NavMeshModifier' component.

check off the "Override Area' and select 'Not walkable', back once more and now your 'Player' should have to circumvent the obstacles as it moves to a specific position. Before we continue make sure to remove the NavMeshModifier component from our Obstacles.


The Second method the simpler in conception, select the 'NavMesh' game object and take note of the step height of our agent, once you do that just pick an obstacle and increase it's height to a value greater than the step height.


In the Third approach rather than increasing the size of the obstacle we instead decrease the agent's step value, to accomplish this we click on the Navigation panel, select the agent tab and decrease the step height to .2 and set the 'Max Slope' to 35 


then select the 'NavMesh' gameObject' in our Hierarchy make sure that you select the inspector again and click the bake button once more.


You can see that our new nav mesh forces our Player to move around our obstacles, however it allows our player to walk ontop of our thick obstacle if it can get up there.

That is enough for this post, 

Check out the code here
Play the demo here

Thursday, 10 November 2022

NavMesh 01

The NavMesh, is a 3D mesh that facilitates the movement of game objects which have the 'Nav Mesh Agent' component attached to them. 

I watched a Youtube video of a very similar example, however generally I like to start from scratch rather than a pre or half baked solution.

Let's start by Creating a brand new Unity Project from the Unity hub

Once you hit 'Create project' depending on your computer, this may be a great time to either grab a coffee or a nap.... After anywhere from 2 to 15 minutes your Empty Unity Project should be open.

Before we get started let's make sure that you have the Navigation Panel open in your project.
go to Window  -> AI ->Navigation

You can snap it anywhere within your project, I for me it just makes sense to tab it with my Inspector.

Optionally you can add the ProGrids package, via the package manager, keep in mind that currently ProGrids is an experimental package and has to be added by Name.

Some of the components that you are going to need do not ship standard with Unity, you have to explicitly add the package by name, because at this time they are 'Experimental', but you're a badass so go head and experiment. 

Open Window-> Package Manager.


With that done we can finally get started. 

Add a 'Plane' to your main hierarchy,

Next, let's create an 'Empty' GameObject in the Hierarchy and add a NavMeshSurface Component to it


Next, in your Assets folder add a 'Scripts' folder and in that freshly created 'Scripts' folder create a PlayerController.cs script.


You'll have to rename it from the default 'NewBehaviourScript.cs' name. Open your script, in your preferred IDE, personally I use MS Code. paste in the following code

//added UnityEngine namespaces
using UnityEngine;
using UnityEngine.AI;
public class PlayerController : MonoBehaviour
{
    //reference of the camera to know what the user clicked on
    public Camera Camera;

    //reference to the thing that will move
    public NavMeshAgent Agent;

    //Create an enum for mouse buttons
    enum MouseButton{ Left = 0, Right = 1, Scroll = 3 }

    // Update is called once per frame
    void Update()
    {
        //check if the user left clicked on something
        if(Input.GetMouseButtonDown((int)MouseButton.Left)){
            //what did the user click on
            RaycastHit hit;
           
            //where did the user click on the screen
            var pos = Input.mousePosition;

            //where from the camera's perspective did the user click
            var ray = Camera.ScreenPointToRay(pos);

            //did the user click on an object
            if(Physics.Raycast(ray, out hit))
                //send the agent to the point the user clicked on
                Agent.SetDestination(hit.point);
        }
    }
}

The above code figures out what did the user click on and tells the agent to go there.

Now we are going to add our PlayerController.cs Script to an 'Empty' game object in our Hierarchy, right click in the Hierarchy and select the 'Create Empty' option.


Once you have created your Empty game Object make sure to add our new Player Controller Script to the 'PlayerController' Game Object. 

While we are add it let's add the reference to our Main Camera, click the little circle next to our camera input and select the main Camera.


with our camera reference added, it seems that we now need to create an agent; for simplicity sake let's add a Sphere to our hierarchy and name it Player. Select your Player game object and hit the 'F' key on your keyboard, this will bring it into focus, make sure that you position it above your plane.


Keep in mind that your position values may be different from mine, all you want to do, is make sure that your 'Player' game object is above the plane. Now we are going to add the 'Nav Mesh Agent' component to your 'Player' game object, as before select the 'Player' game object click the add component button in the inspector and select 'Nav Mesh Agent'.


With our 'Nav Mesh Agent' component added to our 'Player' game object we can now reference it in our 'Player Controller' game object. Select the player controller and like we did with the Camera reference our Player.


We now have one final step before the super cool step of a moving ball, click on the 'NavMesh' game object we created earlier in the hierarchy and click the 'Bake' button.


Notice the light blue added to our Plane, this is the movable area by our 'Agent' now if you click Play button we can click anywhere on our plane and move our 'Player' game object to that location. 

Test out the demo here
Check out the Source here

Thursday, 3 November 2022

Progrids Unity add in

Progrids is a unity package that let's you set up a 3d grid snapping, that is you can set the value that you want your assets to snap to, it's extremely helpful when setting up your level. you can read about it here:
About ProGrids | ProGrids | 3.0.3-preview.6 (unity3d.com)

However currently adding it to your project is not very straightforward, it's in prelease and does not come up in unity registry under the package name, the easiest way is to add it by name.

Go to top menu select Window-> Package Manager

with your package manager open in the top left corner click, the little plus sign and select add package by name or from git URL.


Next type in com.unity.progrids and hit the add button


and that's it you'll have successfully added progrids to you project.

Tuesday, 1 November 2022

Unity Coroutine

Let's say that you want to run some asynchronous task after a timer of some sort, then the StartCoroutine method is your friend, with a very set it and forget it approach.

    // Start is called before the first frame update
    void Start()
    {
        StartCoroutine("doSomethingAfter3seconds");
        StartCoroutine("doSomethingAfter5seconds", "Say hi");
    }


     IEnumerator doSomethingAfter3seconds(){
        yield return new WaitForSeconds(3);
        Debug.Log("it's been 3 seconds");
    }

      IEnumerator doSomethingAfter5seconds(object value){
        yield return new WaitForSeconds(5);
        Debug.Log($"it's been 5 seconds, {value}");
    }

And that's all there is to it, there's also controller function. that will let you stop your coroutine or stop all coroutines.

StopCoroutine("doSomethingAfter3seconds");
StopAllCoroutines();
       

Monday, 17 October 2022

CICD pipeline for Azure Blob storage with CDN - Part 6 Set up Continues Deployment of our Hero Images

This is more of a continuation of the previous post in which we configured our initial release pipeline and configured our Continuous Deployment trigger. In this post we are going to simply: 

  1. unzip our hero images, 
  2. then copy them over to our Blob storage 

Lets start by adding our delete content form our blob storage task.


Once you've opened the stage view start by renaming your stage to something more readable "Unzip and upload hero images"


once, that's done, click the "+" to add a task to the stage, search for extract files and add the "Extract files" task


Now we are going to have to configure our extract tasks job.


There's only two things you have to do and a third nice to have,
  1. set the display name to something more meaningful.
  2. set destination path: "$(System.DefaultWorkingDirectory)/_pav.content.cdn/unzip"
  3. set Overwrite existing files to true
  4. finally click the Save button
Next let's add another task that will let us copy our hero images to our blob store, click the add task button and search for "Azure file copy"


Add the azure file copy task, here we are going to finally copy our hero images to our azure file storage.


Now set all of your File copy properties. 


save your pipeline and run it, and more likely than not your CD pipeline will fails, with the following descriptive error.


Upload to container: 'container-public-pav-master' in storage account: 'stpavmaster' with blob prefix: '' failed with error: 'AzCopy.exe exited with non-zero exit code while uploading files to blob storage.' For more info please refer to https://aka.ms/azurefilecopyreadme

my favorite parts is "AzCopy.exe exited with non-zero exit code while uploading files to blob storage", luckily for you after struggling with this for days, I learned that it's a permission issue.

Click on the gear at the bottom left and select service connections,


Click on the service connection that you are using in your pipeline.


Next click on the "Manage service Principle" link button. notice that the arrow is pointing to the wrong link button.


Take note of the display name, you're going to have to grant permissions in your azure environment to upload to your blob storage.

Next you'll have to open Access control in your azure portal for your subscription, 


This will open a drop down list, form it choose "Add role assignment" which will now let you add the Blob storage contributor role to your application service connection.


with that selected, hit the next button


Here you'll have to select the member and you'll have to manually paste in the name from a few steps above, select the member and assign the "Storage Blob Data Contributor role" this will let your dev ops site push files to your blob storage.

Now with your permissions set correctly you can create your release and you should be able to push your hero images to your Blob storage.

The blob storage URL for your images should be something along the lines of

https://stpavmaster.blob.core.windows.net/container-public-pav-master/hassan-pasha-AwssoaXCosQ-unsplash.jpg

and you should be able to access that exact same file using your cdn end point

https://cdn-endpoint-pav-master-global.azureedge.net/container-public-pav-master/hassan-pasha-AwssoaXCosQ-unsplash.jpg

and that's it, for the most part, there's two steps I'm leaving out, because I'm just too exhausted.

one you should delete all of the files in your blob storage before pushing them, to ensure that you do not host useless data.

and two you need to purge your cdn endpoint, so that your users aren't being hosted stale data.

Thursday, 13 October 2022

CICD pipeline for Azure Blob storage with CDN - Part 5 Set up Continues Deployment of our Hero Images

One of the saddest parts of Continuous Deployment is that it can't be scripted and we have to go through Microsoft anything is possible, it's just conveniently hidden behind 35 clicks and 17 modals. To get started log into your Azure Devops portal. 

Once you have to portal open click on the rocket ship and go to releases


Next click the "New pipeline" button. This will let you choose from some predefined Continuous deployment configurations, however we are going to start from a blank slate, so just choose "Empty job"


Next the we'll be prompted to start with the first stage of our continuous deployment, but before we get started, well select our artifact from our Continuous Integration pipeline, in this case the zip file in the drop folder. 

First close the stage panel, we'll get back to that later.


With the stage panel closed, click the "add artifact" area of the Artifacts section.


Now you'll be asked to choose the source pipeline, that's the YAML file we built previously, it defaults to our project name, however we could have given it a more specific name.


Once you choose your source pipeline everything else should just auto select for you.


Once you have everything selected, click the "Add" button, now that you've added your artifact (the output from the Continuous integration pipeline, the "zip" file in this case). You'll have to add the trigger for this pipeline, click the little lightning bolt.


You should be looking at the following, enable the continuous deployment trigger, and then close the panel, you could add a branch filter, but we only have a master branch in this example.


With the Continuous deployment trigger flyout panel collapsed, we're going to change the name of our Pipeline, just to make it extra clear at what it does. at the top center, click on "New release pipeline" and give it a new name' I'm calling it "Hero Image deployment pipeline" Once you've changed your Pipeline name, save your progress.


Once you click save, you'll be asked to which folder you would want to save to, for now just leave it as the root and hit the "OK" button.


That's it for now we can take a break, next we'll configure our actual pipeline.